
Well, my DIY kitchen island is finally complete! I feel like doing a victory lap around the house with the rocky theme playing….but before I do that there are some DIY steps I need to fill you in on of how I turned my island into this from where we last left off. See where the project started at part one and part two of the series!

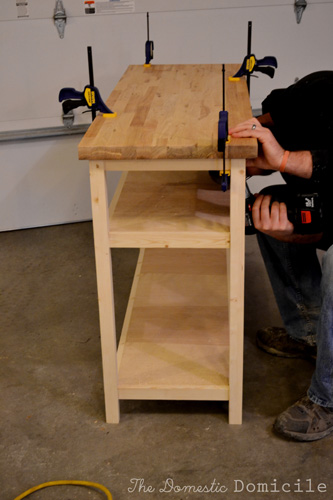
Ohh so long ago we left off after we created the “bones” of the island. Next you need to pre-fit your top. We created our own brackets out of scrap wood, but if you want to save time/hassle you can buy some L brackets to fit your butcher block countertop onto the base. Use your pocket screw jig to create individual brackets. Screw your two holes and cut around each individual hole to make a small brace. Make 8 total braces.

With the pocket screw facing toward your base screw in 3 brackets across each length and one on each short side. You can use a bracket to help you with the process.

Fit your countertop on square making sure the same amount of countertop hangs over each side. Then clamp it and screw straight up through the brace you just made (there will be no screw guides for this). Then take it off baby and paint your base! The purpose of pre-fitting the countertop is to make it easier to screw on once it is painted and prevent any paint chipping or cracking. Next paint the base and let dry according to package instructions.
Next put 2 coats of oil on your countertop. We used SKYDD brand from IKEA. Oil the countertop according to package directions and let dry. Ours dried over night. Then you can re-attach your top easy as pie because you already pre fit it!

At this point you are so close to done you can taste it! Calculate how many pans and pots you have to hang, making sure each will fit taking the length of the cup hook into consideration. Also, VERY IMPORTANT, make sure the opening of the cup hook will fit the handles of your cookware. I had to buy one cup hook that was slightly bigger to fit my big sauce pot, but the decorative lip will hide the hooks so you can go with different sizes and nobody will be the wiser!

Then mark off with a pencil where you want your pots and pans to hang. I started my first pot 4 inches from the left side and 3 ½ inches from the front (if you are looking at the island). In the front row after the first pot (4 inches from the left) I put the next two at 15 inches apart and 3 ½ inches inset. The last pot should be 11 inches from the right side. For the back row I started the first pot 3 inches from the back, and 11 inches from the left. I then spaced the next two pots 15 inches apart and 3 inches inset from the back. The last pot should be 4 inches from the right. I placed my pots under the markings and held them up to make sure they looked right.

Then using your pencil marks as a guide, with a small drill bit drill holes in each of the pencil marks. This makes it easier to screw the cup hooks in. It is VERY IMPORTANT that you have a guide on your drill bit to avoid from screwing all the way through the board!! Then screw in your cup hooks and hang those pots!

And then you’re done! Yippee, Yahoo, Hooray!

The kitchen island/microwave cart has given me a TON of extra storage with all the baskets……

which happen to be BYHOLMA (I think) baskets from Ikea from our first microwave cart/island! I put pads on the bottom so they don’t scratch off the paint. They are amazing since I have one drawer in my kitchen…..yes one.

I threw my kitchen aide mixer and some cookbooks on top to create a festive and fun look. I also re-located my herb plants back to the window because the color looked so great!

It feels so great to be done with this project and bring some cheer into the kitchen. The extra workspace has also been an added bonus. I decided not to use the cutting board for actual cutting because of fear it would get ruined, but it serves for a good space for my cutting board when I’m chopping vegetables or to roll out pizza crusts or noodles! Next up? Painting the cabinets white!
This looks great Ann!
ReplyDeleteThanks Ellen!!! Wait until you see what I have in store for the cabinets!
ReplyDeleteI am late to the party, but this is fantastic! your mother...
ReplyDelete