Showing posts with label painting. Show all posts

Monday, February 20, 2012

Phase Two: Puttin' on the Paint

After we prepped our cabinets and sanded them down, we used de-glosser to make sure the paint would stick to the boards extra good.  Deglosser does the job of sanding, but for this project we wanted to be extra careful so we did both!  We used a cloth to wipe a thin coat of deglosser all over the cabinets.While we waited for the deglosser to dry we opened our beautiful can of Behr semi gloss enamel paint and primer in one in the lovely shade of ostrich.


Then we made what I’m thinking is a little mistake. Okay maybe a big mistake....but I assure you it wasn't disasterious. You see we added Floetrol to the paint.  This is a product used to help decrease brush stokes in the paint and makes the paint take longer to dry so you can finesse it so it is juuuust right.  It also makes the paint a bit thinner than normal.  Since our wooden cabinets had pretty deep wood grain, the thinner paint settled into the cracks easier causing the wood grain to become apparent.  This might have been a good product for wood that is flatter and you are worried about brush strokes.  In the end the painting method we used cut down on roller marks significantly where we had virtually none, so brush marks weren’t our issue.  What we did have however, is a paint job that took several more coats than we anticipated due to the thinness of the paint.      


We first used a typical roller to roll on nice thin layers of paint.  Afterwards we came through with a fine roller that looked like a sponge.  The fine roller doesn’t hold a lot of paint so you wouldn’t want to do your paint job with it….BUT rolling over your existing paint job helps smooth your paint out a ton! A 2 inch brush was used to help get into the corners and the tricky spots.  I used a small art brush to paint on the edge of the crown molding between the ceiling.       


After we put on 6 coats of paint onto the cabinets we could start getting our lives back to normal.  Meaning we could start to take all the plastic off the walls, floors, countertops etc.  The painting took 3-4 days to get all the coats in the kitchen on the cabinets, which felt like FOREVER for our kitchen to be out of commission.  But we did survive!       


Thankfully my pantry came out unscathed and un-dusty from the craziness of the kitchen painting situation.  I was glad that I had put plastic over that portion, but happy I took everything else out.  Having all my dishes and kitchen accessories in the dining room allowed me to have easy access to everything rather than peeling off the plastic every time I needed something.         


After all the plastic was gone I felt a little better and half way back to normal!  The next phase of the painting project is to put all the dishes back in the cupboards and finish painting the cabinet faces…..which feel like they are taking forever!  Check back in for more kitchen progress and happenings!

Thursday, December 29, 2011

DIY Kitchen Island Reveal

Well, my DIY kitchen island is finally complete!  I feel like doing a victory lap around the house with the rocky theme playing….but before I do that there are some DIY steps I need to fill you in on of how I turned my island into this from where we last left off.  See where the project started at part one and part two of the series!    


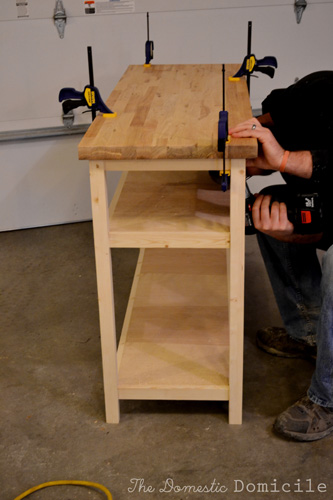
Ohh so long ago we left off after we created the “bones” of the island.  Next you need to pre-fit your top.  We created our own brackets out of scrap wood, but if you want to save time/hassle you can buy some L brackets to fit your butcher block countertop onto the  base.  Use your pocket screw jig to create individual brackets.  Screw your two holes and cut around each individual hole to make a small brace.  Make 8 total braces.     


With the pocket screw facing toward your base screw in 3 brackets across each length and one on each short side.  You can use a bracket to help you with the process. 


Fit your countertop on square making sure the same amount of countertop hangs over each side.  Then clamp it and screw straight up through the brace you just made (there will be no screw guides for this).  Then take it off baby and paint your base! The purpose of pre-fitting the countertop is to make it easier to screw on once it is painted and prevent any paint chipping or cracking. Next paint the base and let dry according to package instructions. 


Next put 2 coats of oil on your countertop.  We used SKYDD brand from IKEA.  Oil the countertop according to package directions and let dry.  Ours dried over night.  Then you can re-attach your top easy as pie because you already pre fit it!


At this point you are so close to done you can taste it!  Calculate how many pans and pots you have to hang, making sure each will fit taking the length of the cup hook into consideration. Also, VERY IMPORTANT, make sure the opening of the cup hook will fit the handles of your cookware.  I had to buy one cup hook that was slightly bigger to fit my big sauce pot, but the decorative lip will hide the hooks so you can go with different sizes and nobody will be the wiser!


Then mark off with a pencil where you want your pots and pans to hang.  I started my first pot 4 inches from the left side and 3 ½ inches from the front (if you are looking at the island).  In the front row after the first pot (4 inches from the left)  I put the next two at 15 inches apart and 3 ½ inches inset.  The last pot should be 11 inches from the right side.  For the back row I started the first pot 3 inches from the back, and 11 inches from the left.  I then spaced the next two pots 15 inches apart and 3 inches inset from the back.  The last pot should be 4 inches from the right.  I placed my pots under the markings and held them up to make sure they looked right. 


Then using your pencil marks as a guide, with a small drill bit drill holes in each of the pencil marks.  This makes it easier to screw the cup hooks in.  It is VERY IMPORTANT that you have a guide on your drill bit to avoid from screwing all the way through the board!!  Then screw in your cup hooks and hang those pots! 


And then you’re done! Yippee, Yahoo, Hooray! 


The kitchen island/microwave cart has given me a TON of extra storage with all the baskets…… 


which happen to be BYHOLMA (I think) baskets from Ikea from our first microwave cart/island!  I put pads on the bottom so they don’t scratch off the paint.  They are amazing since I have one drawer in my kitchen…..yes one. 


I threw my kitchen aide mixer and some cookbooks on top to create a festive and fun look.  I also re-located my herb plants back to the window because the color looked so great!   


It feels so great to be done with this project and bring some cheer into the kitchen.  The extra workspace has also been an added bonus.  I decided not to use the cutting board for actual cutting because of fear it would get ruined, but it serves for a good space for my cutting board when I’m chopping vegetables or to roll out pizza crusts or noodles!  Next up?  Painting the cabinets white!    

Monday, October 3, 2011

Painting Living Room Trim


Do you know what our living room makeover needed? Yup. White trim.  Our living room has slowly been progressing and we thought it was time to take care of the trim, and the wooden paneling back wall – yikes!


We started by sanding…a lot!  The nice gloss on the trim had to be sanded down in order for the paint to stick.  So we got out our handy dandy sander (and the hubby attached it to the shop vac to decrease the mess) and got to work.


We..um I mean he… sanded and sanded and sanded some more.  Hey – he made me a deal that if I baked him cookies he would sand.  It sounds like a fair trade! Make sure you wipe your walls before prepping to paint!


Then we taped all around the trim and put plastic over the floors.  In our house everything has the potential to turn into a cluster f*** so we always prepare for the worst.    


Then we opened our nice white paint.  Technically it is Ostrich from Behr – with the paint and primer combined, our favorite!  We came up with that color because we realized that the trim in the living room connects to the dining room, which is connected to our white corner hutch, and THAT all connects to the kitchen – which we also have plans to paint white.  We needed to think ahead since everything is connected we needed to choose the right color the first time, or suffer repainting all the trim…ugh! So much pressure!      


Okay so I apologize for the terrible picture.  It was low light, my ISO was high to compensate…which turned out slightly fuzzy.  Oops.  Anyhoo here it is with the first coat.  Does it look scary to you?  It did to me…so much white, AND so much stuff cluttering the room.  When we paint with plastic the light usually reflects white to make the room look very different than when everything fills the room.  I held my judgment and you should too – check back in for the reveal!        

Wednesday, September 14, 2011

Living Room Update

As promised, I am now just getting to updated living room pictures.  Remember when I painted the wall here? Or got the new chairs here? Good times.  Everything else in the room I already had so it is a truly work with what you’ve got room.  A lot of the stuff is temporary but I am pretty pleased with results until something more permanent is created.  Is it close to finished? Of course not!


I brought these throw pillows in that I re-covered for a pop of color and used the ottoman from here as a temporary coffee table. I also used my sand hurricane from my coffee table update, and the electric insulators from this post


My amazing bird finds, and globe that was a gift from my sister in law work well with the texture of the woven tray.  My sister in law bought the globe at a rummage sale when she was, like 7.  I think it is very charming!


These old keys were salvaged from a friends Grandpa’s garage and are placed on top of some vintage books.  I used a lot of different shades and colors of blue to create a monochromatic effect.


I used this vintage basket as a holder for all my magazines.  I like how the basket brings a rustic and vintage touch to the room to create an eclectic feel against the more traditional cottage looking chairs.


I transported this pale blue Ball canning jar that holds my sentimental wine corks to the mantel.  I tried to keep the mantel color pallet very basic with blues and whites as to not overwhelm the room.


I love that you can put a starfish almost anywhere and it will look great!


As we think about what we want this room to eventually look like we are going to be adding the couch, possibly DIYing a coffee table, and adding a funky rug.  We will definitely be giving the back wall, which is still wood, a makeover and adding some bold curtains.  A new side table is potentially in the works and something needs to be done with that mantel.  There is a lot I have going on in my head for this room, and I am excited to see how the vision comes to life!

Friday, September 2, 2011

How to Paint a Wall: Our Living Room

Remember when I shared paint swatches for my living room waaay back here?  Ya, it’s been awhile.  Well, the official winner for paint was Agave from BEHR.  We took a trip to the Home Depot and came back with bags full of painting supplies and two gallons of BEHR Premium Plus Ultra Paint and Primer in One in Interior Satin Enamel.  Besides paint here is what you will need before you get your painting on:

  • Paint Rollers
  • Smaller Brushes
  • Drop Cloth
  • Painters Tape (I recommend Frog Tape)
  • Sander/Sand Paper
  • Paint Trays
  • A step stool (if you are short like me and need a little…boost)
  • Nail Hole Filler
  • Putty Knife
  • Screw Driver

If you remember, we were working with two dark and mysterious maroon walls that definitely needed a makeover.


The first step is to prep your surface.  This means taking off all light switches, vent covers, etc. that will be hard to paint around.


Then put down an initial drop cloth (to catch all the dust).  We used a cheap plastic one from Home Depot. 


Next, you need to make sure your wall is nice and smooth so that new coat of paint looks nice and smooth.  Take out all your nails and sand down the nail holes and rough/raised patches.  This can be anything from a bad mud job that left some bumps on the wall to previous paint drips.  It’s all gotta go. 


After all that sanding there are probably a few holes in the wall (from nails) and a lot of dust!  Wipe your wall clean and use a your putty knife to spread the nail hole filler over your holes. When doing this my first instinct was to wipe off all the nail filler with the putty knife and make it nice and flat.  That’s a bad idea because then when the mud dries there still may be an indent from your hole.  Thank goodness I had the hubby around to set me strait.  It’s best to leave the filler raised at bit.  Let it dry for 15 – 20 minutes (test it because you’ll know if it’s still wet) and sand down again to make a smooth finish.  Wipe down your wall and you are now ready for painting….while almost!


You then need to tape. Around everything.  This means trim, where one wall meets another (if the wall is a different color), and any other weird obstacles that are in your way.  It was pretty humid the day we were taping, even with the air conditioning on, so getting the tape to stay was a bit tricky.  We brought in our dehumidifier which was amazing for the tape, and also helped the paint dry better!


Then secure your drop cloth over your whole floor.  We have hardwood in the living room so it was really important to us that we didn’t ruin it with a big ole' paint splotch.  You probably feel the same about your house.  If we were expert painters we probably could have gotten by with just around the edges BUT did we want to take that risk? Nope!


Now you are officially ready to open that paint can!  A great tip the hubby taught me is that when you open the can, put a few nail holes around the rim of the can where paint tends to get stuck (which is a beeyotch when it dries there and either gets into your paint OR makes the can really hard to open).  This allows the pain to naturally drain back down into the can where it belongs.


Since we got BEHR paint with primer we got to skip the step/work/extra money for primer! Woo hooo!  I totally recommend this to anyone thinking about painting.  We got er’ done in only two coats!  Start by painting just around the edges of everything with a small brush.  This makes it easier when you are painting with your roller so you don’t have to get too close to the edges, or your ceiling, or anything else that could be disastrous.  It’s kind of like making a line to color in. 


Next use rollers to paint in the rest of your wall.  For most people, the W pattern works best, but you will find your rhythm of what works for you!


Let the paint dry the suggested time on the can.  I think we went a little over at 6 – 7 hours for dry time when the can recommended 2-4.  After your coat has dried, repeat painting the edges and filling in the middle with a roller as many times as you need to cover your wall.  For us it was only two!  Then roll up your drop cloth, clean off your brushes, and voila! You have a new room!


Wednesday, June 29, 2011

Picking a Paint Color

We have made the decision that the cranberry colored paint on the walls has got to go. Like now.  It’s so bold making us feel like we are closed in, not that we spend a lot of time in there due to the lack of furniture.  BUT because there are no couches, tables, and chairs to move around we decided this would make for the perfect time to paint while we save some dough to buy furniture.  This decision means that we FINALLY get to paint a wall!  Can I get a woop woop?

I knew I wanted our color to be in the pale aqua family because I am loving the cool blues with a hint of green we have going on in the accessories in the kitchen.  I felt this paint color would be calming while creating a flow between rooms.  I then honed in on Smokey Slate color from BEHR paint.  I was CONVINCED this was going to be the color and wanted to immediately jump in and buy the whole 2 gallons we needed for the living room.  The hubby talked me down to a paint sample and I reluctantly agreed.


I chose to paint two coats of the samples in two different areas of the living room.  I choose those different spots because in different areas of light the colors can look completely different.

I first painted by the door


and then by the window


and the decided it was too light and I didn’t like it.  I wanted the paint to have a calming light feel, but I felt we needed to go just a touch darker.  Cue the second trip to Home Depot.  Having learned my lesson I brought back two more colors that I matched as best I could to the original color.  The first was Lotus Leaf, which is slightly greener than the original sample, and the second was Agave, which is slightly bluer than the original sample.  I know, they look like the same color, but they are slightly different.


I then proceeded to paint these two samples by the window and by the door.


Why the two colors of painters tape you ask?  I am doing my own study to see what painters tape works better: the original blue kind, or the new frog tape.  I will let you know if I am impressed.  Now I can enjoy watching my paint dry!