
When you have cut all your pieces and glued your boards together here, it’s time to take the next steps! When your 1 ½ x 1 ½ x 33 ½ glued boards have dried (follow package recommendations for dry time) sand the sides that were glued together with 80 grit sand paper. I used an electric sander. Make sure the glued sides are even and there is no glue residue left over or uneven boards. If you have done a good job you can barely tell what sides you glued together and what sides are the real wood. Then sand all sides with 220 grit sand paper to smooth everything out. Next, cut the newly sanded 1 ½ x 1 ½ x 33 ½ boards down to 32 ½ trimming a bit from each end to make it even. These pieces will be referred to as the “Leg” pieces. If you want to get fancy you can cut angles on your legs like the picture below. I have no idea how the hubby did it so if this looks confusing I suggest you get help OR have straight legs!

Now it’s time to put it all together! Take two Leg pieces and three Trim A pieces. If you cut fancy leg angles make sure these are facing inwards. Place the two Leg pieces 44 ½ inches apart. The three Trim A pieces will be drilled into the Leg pieces using the pocket screw holes as a guide. You will inset your Trim A pieces ¼ inch from the front of the legs. Screw in your first Trim A piece flush with the top of each Leg piece. Screw the second Trim A piece 8 ½ inches from the top. Screw the third Trim A piece 28 ¾ inches from the top.

Repeat that step for the remaining 2 legs and 3 Trim A pieces. Side note: when you complete this step make sure the “good sides” of all your boards are facing outward.

Take one of the Leg and Trim A completed sides and lay it face down. Take three Trim B pieces and inset ¼ inch. Screw the 3 Trim B pieces into the legs using the pocket screws as a guide. Make the Trim B pieces line up with the Trim A pieces, the first one being flush with the top, the second Trim B piece 8 ½ inches from the top, and the third 28 ¾ inches from the top. Repeat for the second side so the Trim B pieces are sticking up in the air.
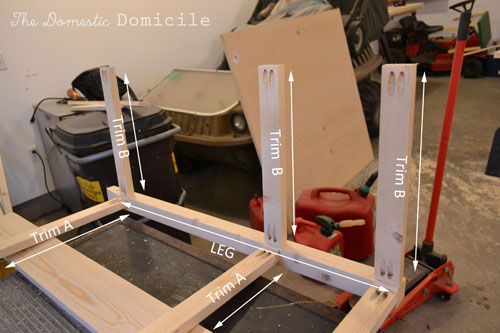
Place the second Leg and Trim A completed side on top, lining up all the trim boards, and screw together using the pocket screw holes as a guide. You have now built your frame!

Now it is time to put the shelves in. Fit each shelf piece into the open spaces on the 1st and 2nd shelf with the pocket screw side down. You may need to tweak your ¼ x ¼ inch notches with a chisel or sand paper so you get a tight fit. You can use a rubber mallet to lightly pound each shelf piece in. Fit the boards in so the top of your boards are flush. Screw in the boards to the trim using the pocket screw holes as a guide. Repeat for each shelf

You have not completed the bones of your shelf! Check back in for the final steps to make the DIY microwave island!

No comments:
Post a Comment
Let me know what you think. I would love to hear from you!