Tuesday, January 31, 2012

Hanging Crane Mobile Tutorial

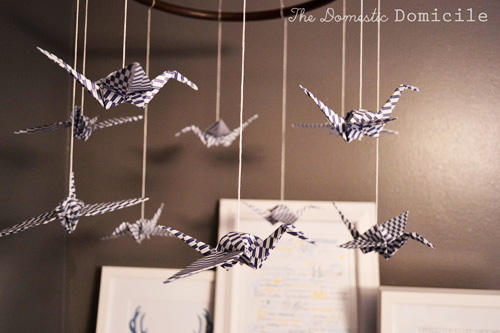
For Christmas which is yes, a long time ago, I crafted up a hanging paper crane mobile for my nephew.  I mean he has to look at something when he is having his diaper changed. 


For this project you need:
  • 1 hoop – mine had a 42 inch circumference and I picked it up at a thrift store  
  • 10 origami sheets 
  •  String or thread
  • 1 washer....like from the garage
  • A needle and scissors 


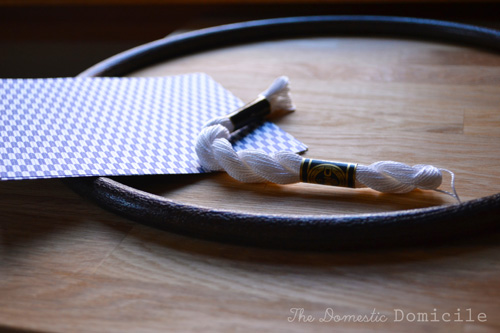
I found my origami paper at Michaels and fell in love with this pattern.    


I then origamied the $hit out of 10 paper cranes.  Let me tell you, the first few didn’t look pretty so I would suggest practicing before you use your first official sheet….a lot.      


I marked out 10 evenly spaced spots where my cranes would go on my hoop.


Then measure out the length of string you need.  The amount you want the cranes to hang down will depend on your ceiling height and how far you want them to hang down from the hoop.  I suggest a lot of measuring.  You also want to leave some room at the top for attaching to the washer to hang your mobile from.  Once you decide how long your string should be and how long you want your longest bird to hang down measure and cut 10 lengths of string.  The thread your needle and only tie one end in a knot.  Poke the needle in the bottom of the crane so the top of the string is now through the crane’s back.   


I decided to have two different lengths of cranes, alternating every other crane.  Make sure that you find out what heights work for your mobile and cut accordingly so every other crane is at a different height.     


Next, attach the cranes to the mobile.  I found it easiest to do over my stool.  It helped me see if any of the cranes were crooked, which some were.  It gave me an opportunity to fix it before I put it all together.       


Gather up all of your top strings and thread them through the washer.  Tie at the desired height and…..hang it up!       


I love this project for a nursery, or every day life.  I am thinking of crafting one up for around the house!  Variations on this project include using maps for the crane material, or creating a “swirly” pattern out of the cranes rather than alternating.         


Wednesday, January 25, 2012

Wine Themed Party: The Big Day

After showing how to make DIY cork place cards, chalk wine glasses (and beer mugs), hanging décor, wine bottle centerpieces, and how to make your own blind wine tasting……the reveal is finally here!  When our mother-in-law got to the party it looked a little something like this:


To the left I hauled the DIY kitchen island into the dining room to set up the blind wine tasting. 


The look was completed with some easy DIY wine themed signs popped into crisp white frames, as well as the blind wine tasting list.  The chalkboard paint glasses served as the drinking glasses for the night as well as a take home favor.     


To the right on the bar is where all the food was set up.  I used my DIY magnet chalkboard as the backdrop for the buffet.      


Written on the chalkboard was the guide to all the different foods that were served that night.  It was a great way to help guest navigate the buffet!        


On the menu were fancy finger foods like these prosciutto wrapped greens!  That way all the guests could snack on food that wasn’t too filling while enjoying the wine tasting.         


Other subtle wine theme touches included these cylinder vases filled with wine corks and a small candle.           


The table was set with plain brown napkins and accented with the guest’s place cards!             

Monday, January 23, 2012

Wine Themed Party: Wine Bottle Centerpiece

For the centerpiece the vision was clean and simple.  We decided we wanted to incorporate wine bottles since it was, ya know, wine themed.  Also, if you are a wine drinker or know anyone who does, this is a fairly reasonable project because all the bottles are free!  After considering our options of using bottles with green colored glass vs. white glass vs. both we decided that the white glasses would create the most simplistic centerpiece with the greatest visual flow.  Here is what you need for the project:

·        Empty wine bottles – we used 12
·        Taper candles – the same number as your wine bottles
·        An old cutting knife
·        Saran wrap

First you need to wash out your wine bottles and take the labels completely off.  When picking your wine bottles it is important that you have different sizes and shapes.


Next you need to cut your candles.  It is very important that you have different candle heights.  When you put them in the bottles you want to make sure that there are a variety of heights for visual interest and all your candles are not at the same level.  If you have a lot of bottles that are the same size and shape creating different candle heights will make them look diverse.  


I used an old bread knife (which is now my craftin’ knife) to cut the tapers to different lengths. 


Now all bottle openings are pretty much the same circumference and you will have to account for the different sizes in the bottoms of your candles.  The shorter candles will  be cut towards the top where the circumference is smaller and the taller candles will have a larger circumference.  Due to a little fire hazard issue (more on that later) we had to cut all the candles fairly short.  Surprise, surprise, when you try to shove those babies into the holes of the bottles….they fall in.  Wop, wop, wop.  A nice little bit of saran wrap around the bottoms will help those candles stay in!  I used the press and seal kind, because it is my fav and more sticky.  The saran wrap is clear so it is virtually undetectable to guests.   


Light your candles and you are done.  I swear this is the easiest and most minimal centerpiece I have ever created.  I like the simplicity and the neutral colors, and of course the ambiance of the candle light! 


No onto the fire hazard bit.  Remember the hanging puff ball décor we made here?  Well that happened to be sitting only slightly below the original candle centerpieces.  Just envision that each candle has….oh about 1-2 inches more on it.  My sister and law and I were hacking away on the candles and shoving them in bottles and the boys (my hubby and hers) came up, took one look at it and said “oh hell no”.  Who knew that the candles had a high potential to engulf the hanging décor in flames?  Now for a while there the boys were not problem solvers….and we did not have time for that.  No.  We were on a tight schedule.  Eventually they reached the agreement and we hacked the candles down.  With the smaller candles there was less drama for the height, but I think all things considered it turned out great.  And my house didn’t burn down so that was a bonus!

Tuesday, January 17, 2012

Wine Themed Party: Hanging Puff Balls

To add to the party décor I decided I needed to do something about my ceiling fan.  I wanted the ceiling to help set the mood for the party and create added interest to the party décor.  For this project you need:

  • 4 small dowels measured out to fit around your fan
  • String
  • Enough tissue paper for 16 hanging puff balls

First attach the dowels together at all four ends with string. 


Add two pieces of string along the width of the dowels.  Make sure they are evenly spaced. 


Now hang that baby up on your ceiling fan.  I will be honest with you, this was a challenge and involved several good bangs to the head before I got it right.  It’s also a challenge that the fan…idk…is meant to move.  You need to make sure that the fan is held steady so your whole decoration isn’t in bits on the floor.    


Next make a ton of hanging puff balls.  Well a little over 16 to be exact.  Don’t know how to make them?  See how I did it here and here.  I attached four puff balls along the width of the outside dowels and each of the strings.  I made several extra to fill in the empty spots and then I was done! My sister-in-law was kind enough to join me in my puff ball making sweatshop, how nice!  Anyhoo that’s how it’s done.  Ohh…what's that you say? You see the wine bottle centerpieces?  Those are next up on the wine themed birthday tutorials!     


Monday, January 9, 2012

Wine Themed Party: Blind Wine Tasting

For the wine themed party we naturally had to have lots of wine with a wine tasting.  With any wine tasting you have several questions to ask yourself the most important being: is the wine the main event or is it just there to aid in fun and conversation?  For this party it was decided that we wanted it to be an added bonus rather than the focus.  When having a wine tasting you need to make sure you have enough bottles for everyone to have a taste of each wine.  Also in arranging the wine you start with the lightest wine and gradually get darker.  Extras that you must have on hand are something to clear your pallet in between wines, we chose pretzels.  Also you need water to swish in your glass to rinse out the old wine and a bucket to dump the extras in.  To put a fun twist on it we decided to have a blind wine tasting.  This means that all the wines are covered and we have to guess what type each one is by taste! The materials needed are:
  • Wine (enough for each guest to have a taste)
  • Wine list
  • 1 yard of fabric and sewing supplies
  • Twine, string, or ribbon
  • 6 thin circles from Michaels
  • Black marker
  • Chalkboard paint
  • Chalk  

So here is how we did it.  I first purchased some linen fabric to cover the bottles with.  I just estimated how many I would need for 6.     


Next I estimated the size of the little sack I was going to put around the wine but measuring it around one of my bottles.  You want to make sure you account for a seam as well as leaving extras at the top to turn the sack under.       


Then just stitch each side of the wine coozie with the bottom folded.  Leave the top open and unhemmed.  Make one for each bottle.  One yard was enough for 6 for mine. 


You are done with your sacks….for now.  Next we turn our focus to how we are going to number each wine.  I considered iron on numbers, but they were to big.  As luck would have it Michaels sells these thin wood circles for like $0.29 each.  They are in the section with all the wooden shapes.  Purchase the same number of circles as you have bottles of wine.      


Drill a small hole in the top of each circle.        


Color the backs of the circles black.  I used a painty marker I had on hand and it worked fabulous!  I started out with a sharpie but the wood absorbed so much of the marker it took a lot of coats so I switched.           


Coat the fronts of the circles with 5-6 light coats of chalkboard pain.  I. Love. Chalkboard. Paint.  Enough said.  Then write the numbers of your wine on each circle. 


Then choose your wines.  We threw a Boone’s Farm in there for a good time.  Cough syrup taste?  Check and check.  If you don’t know what Boone’s Farm is you probably weren’t poor in high school.     


Then make a nice wine list so as you go along everyone can guess.  You can either make a score card or verbally shout out your guesses as we did.  Of course the wine order should be different than the list order.         


Turn your wine cozies right side out and fold the tops down inward.  Secure with a piece of twine, rope, or ribbon.  And of course enjoy all the delicious wine!  Cheers!          

Thursday, January 5, 2012

Wine Themed Party: Chalk Wine Glasses and Beer Mugs

My next craft project for the Wine Themed Party involved chalkboard paint and wine glasses….surprise surprise! I am obsessed with both so a project that puts the two together is right up my alley.  The materials you will need for this project are:
  • Wine glasses and um….beer mugs for the guys
  • Painters tape
  • Plastic bags
  • Chalkboard spray paint
  • Chalk


I purchased a glass for each guest and got a great deal at Walmart, $0.99 for each wine glass and $1.30 for each beer mug.  First you put painters tape in the outline that you want the chalkboard paint.  For the beer mugs I wanted mine in a rectangle.  Make sure the lines are centered and straight on each glass and you press down the painters tape hard to make sure there is no leakage.   


For the wine glasses I wanted the chalkboard paint to go up the stem so I choose a spot and attempted to tape a seamless circle around the stem.     


Then take your plastic bags (one for each glass) and wrap those babies up good enough so only the portion you want spray painted is showing.  I used painters tape to secure the bags and taped out from the original painters tape lines.       


Then spray away in nice light coats. 


I ended up doing 6 light coats of the chalk paint and it seemed to hold up very well against writing on the glasses and erasing!   


Then take your chalk and write the names of your guests.  This will ensure your guests will never loose their drink and are a neat alternative to wine charms.  You can use them as place cards or arrange them around a tasting table.     


Plus….it looks super cool…..which is a bonus. 


The only materials I had to purchase for this project was the glasses since I already owned all of the other materials.  This is a cheap and easy way to let your guests take away a special something from a fabulous party!    

Tuesday, January 3, 2012

Happy New Year!

Well it is 2012, so that leaves me asking where the heck did 2011 go? Oh ya….we house hunted/stalked, bought a house, and have spent the majority of our time renovating and redecorating.  Oh yaaaa. The hubby and I had quite the exciting new years.  It was raining (a miracle in December in Minnesota) so we walked up town to our local bar for some food because……our kitchen is torn apart. Why you ask? Well because we spent new years and the days leading up to it (and trailing it) doing a little DIY project in the kitchen.  Okay I guess more like a moderate to major DIY.  Three little words can describe the joy of this project.  Painting.  Cabinets.  White.  OMG!  Here is a little sneak peak:


I feel better already even though the DIY is in progress.  Check back to get the full scoop of the DIY adventure! Hope you all had as exciting dorky of a new years as we did!